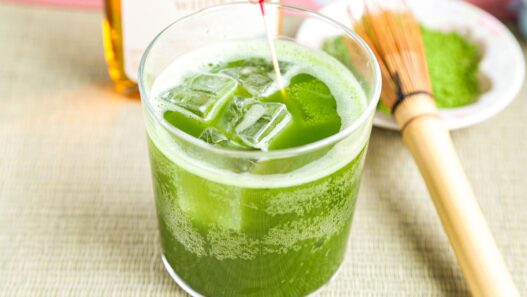


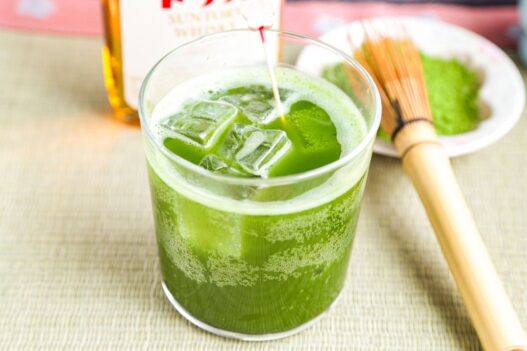

This matcha whiskey highball is a simple Japanese-inspired cocktail made with matcha powder, Japanese whiskey, soda water, and ice. It's light, refreshing, and easy to pair with salty snacks, grilled foods, and izakaya-style small plates.
Highballs are one of the easiest drinks to find in Japan. Walk into an izakaya, yakitori shop, casual bar, or chain restaurant, and there is a good chance you will see one on the menu. It is usually made with whiskey, soda water, and ice, served tall and cold, and meant to be enjoyed with food.
This whiskey highball recipe is flavored with a little matcha powder. The matcha gives the drink a subtle grassy taste and a clean, earthy finish. It is a quick cocktail to make at home and a fun drink with Japanese snacks, or to serve at your next dinner party.
What is a Japanese Highball?
A Japanese highball is a simple whiskey and soda drink served over ice. While the highball didn't originate in Japan, it became a big part of their drinking culture after whiskey became more accessible in the postwar years. It started to pop up more often in bars and izakayas, and patrons favored it over a whiskey served neat or on the rocks, because of its refreshing and quenching properties.
Today, the highball is everywhere in Japan, from old-school izakayas to convenience store cans. It's easy to drink with a meal, which is a big reason why it has stayed so popular.
Why it's Popular in Japan
Highballs fit naturally into Japanese drinking culture because they work well with food. They sit in the same casual drinking category as lemon sours, umeboshi sours, and chuhai, which are all common drinks served in izakayas. In Japan, drinking is often not just about the drink itself. It's about sitting down with friends, coworkers, or family, and sharing a variety of dishes over several rounds.
At an izakaya, people usually order small plates throughout the evening instead of one large meal. A highball works in that setting because it does not overpower the food. It can be served with fried chicken, grilled skewers, gyoza, sashimi, tofu dishes, and salty snacks without feeling too heavy.
Another reason highballs are popular is that they are lighter than many cocktails. The soda water dilutes the whiskey, so it can be enjoyed more slowly and feels closer to a beer or chuhai in the way it is consumed.
Matcha Whiskey Highball Ingredients
- Matcha powder: Use plain matcha powder, not a sweetened matcha latte mix. Culinary grade matcha is fine for this recipe since it's not the main and only flavor of the drink.
- Japanese whiskey: Use a Japanese whiskey you enjoy drinking. I'm using Torisu which is a very popular Japanese whiskey used for making highballs in Japan. Fun fact: Japanese bottles are often labeled “whisky,” without the “e, because they follow the Scottish distilling techniques.
- Soda water or sparkling water: Use very cold soda water or sparkling water. The colder it is, the better the bubbles will hold.
- Ice cubes: Plenty of ice cubes to keep this cocktail chilled.
Why Matcha Works
Matcha elevates a highball by introducing a gentle bitterness that beautifully complements Japanese whisky. Unlike a sweet matcha latte, this flavor profile mirrors an effervescent iced green tea anchored by a smoky backbone.
Plus, adding matcha to a cocktail is just fun. It gives the drink a stunning, vibrant green color and a quick hit of antioxidants. It's definitely still a cocktail, not a health drink, but that splash of matcha makes it feel fresh, modern, and uniquely Japanese.
How to Make a Matcha Whiskey Highball
Scroll down to the recipe card for the full recipe.
Start by adding the matcha powder to a highball glass or a medium size glass. Pour in the whiskey and whisk until the matcha is smooth. Add the ice cubes, top with soda water, and serve immediately.
Tips for Making the Best Cocktail
- Whisk the matcha with the whiskey before adding ice. Matcha can clump when it stirred in liquid, so it's important to whisk it first with the whiskey until it's smooth, and then add the soda water.
- Use cold soda water. Warm soda water goes flat faster and makes the drink feel dull.
- Add the soda water last. This keeps the carbonation from disappearing before the drink is served.
- Do not over mix after adding the soda. A gentle stir is enough. Over mixing will remove a lot of bubbles and make the drink flat.
- Serve the drink right away. Highballs are best with lots of effervescence.
What to Serve with Matcha Whiskey Highball
This drink goes well with the kind of food you would order at an izakaya: salty, savory, grilled, fried, or lightly dressed dishes. Think of it as something to serve with snacks and small plates rather than with greasy foods or main dishes.
A few good pairings are:
Print
Matcha Whiskey Highball
This matcha whiskey highball is a simple Japanese-inspired cocktail made with matcha powder, Japanese whiskey, soda water, and ice. Serve it right away with izakaya-style snacks, grilled foods, or salty small plates.
- Add the matcha powder to a highball glass or medium size glass (if you are using less ice).
- Add whiskey and whisk until matcha is smooth.
- Top with ice cubes and add soda water.
- Serve immediately.
Frequently Asked Questions
No. A small whisk works well. You can also use a handheld milk frother if that is what you have.
Yes, but the flavor will change depending on the whiskey. Japanese whiskey tends to work well in highballs because it is often clean, balanced, and easy to pair with soda water.
I do not recommend it for this recipe. Tonic water is sweet and bitter, and it will change the drink quite a bit. Soda water or sparkling water keeps the highball closer to the Japanese style.
The matcha probably was not whisked enough before the ice and soda water were added. Whisk it directly with the whiskey first, until smooth, then finish the drink.